Replacing an RV Bathroom Vent Cover: A Comprehensive Guide
The bathroom vent in a recreational vehicle (RV) serves a crucial function, expelling moisture, odors, and potentially harmful gases from the enclosed space. The vent cover, specifically, provides protection against the elements, preventing rain, debris, and insects from entering the RV. Over time, exposure to sunlight, weather, and physical impact can cause the vent cover to become brittle, cracked, or completely broken. A damaged vent cover compromises the integrity of the vent system and can lead to water damage within the RV, fostering mold growth and potentially damaging the roof structure. Therefore, timely replacement of a damaged RV bathroom vent cover is essential for maintaining a healthy and functional RV.
This article provides a comprehensive guide to replacing an RV bathroom vent cover, covering the necessary tools, step-by-step instructions, and important considerations for ensuring a successful and long-lasting repair. The process is generally straightforward and can be accomplished by individuals with basic DIY skills, saving the cost of professional RV repair services.
Identifying the Correct Replacement Vent Cover
Before initiating the replacement process, accurately identifying the correct replacement vent cover is paramount. RV vent covers are not universally sized, and selecting the wrong one can result in compatibility issues and a failed installation. Several factors must be considered during the identification process:
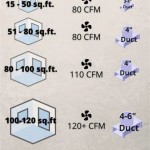
Vent Size: The most critical factor is the size of the existing vent. This is typically measured in inches and refers to the interior dimensions of the vent opening on the RV roof. Common RV vent sizes include 14" x 14" and 20" x 20". Measure the existing vent opening carefully to ensure accurate sizing. It's also helpful to measure the exterior dimensions of the old cover, though the interior dimensions are more crucial for compatibility.
Vent Style: Different RV vent styles exist, each with unique mounting mechanisms and operational characteristics. Common styles include:
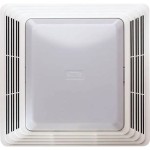
- Standard Vent Covers: These are the most common and simplest type, typically featuring a plastic or metal cover that hinges open or slides on rails.
- Powered Vent Covers: These vents include an electric fan to actively exhaust air from the RV. Replacement covers for powered vents often require specific models designed to accommodate the fan motor and wiring.
- High-Profile Vent Covers: These covers are taller and more aerodynamic, often used in conjunction with vent covers that are intended to remain operable at various speeds when the vehicle is in motion.
Manufacturer and Model Number: If possible, locate the manufacturer and model number of the existing vent. This information is often found on a sticker or label inside the vent housing. Knowing this information simplifies the search for a direct replacement part, ensuring a proper fit and functionality. Contacting the manufacturer or an RV parts supplier with this information will help ensure obtaining the correct replacement cover.
Material: RV vent covers are typically made from UV-resistant plastic or metal. Plastic covers are more common due to their lower cost and lighter weight. Metal covers offer greater durability and resistance to impact. When selecting a replacement, consider the climate and environment in which the RV will be used. In areas with intense sunlight or frequent hail, a more durable metal cover might be a preferable choice. Plastic covers can become brittle with UV exposure and are more prone to cracking.
Tools and Materials Required for Replacement
Once the correct replacement vent cover has been identified, gather the necessary tools and materials for the replacement process. Having everything readily available will streamline the project and prevent unnecessary delays.
Essential Tools:
- Screwdriver or Drill with Appropriate Bits: Most RV vent covers are secured with screws. Determine the type of screws used (Phillips head, flat head, square head, etc.) and have the corresponding screwdriver or drill bit on hand.
- Putty Knife or Scraper: A putty knife or scraper will be needed to remove any old sealant or caulk around the vent flange.
- Caulking Gun: A caulking gun is essential for applying new sealant around the vent flange to create a watertight seal.
- Ladder: A sturdy ladder is required to safely access the RV roof. Exercise caution and follow proper ladder safety procedures.
- Cleaning Supplies: Cleaning supplies, such as a brush, sponge, and mild detergent, are helpful for cleaning the vent flange before applying new sealant.
- Measuring Tape: Helpful for confirming the dimensions of the opening.
Essential Materials:
- Replacement Vent Cover: The correct replacement vent cover, as identified in the previous section.
- RV-Specific Sealant: Use a high-quality RV-specific sealant, such as self-leveling lap sealant or butyl tape, to create a watertight seal around the vent flange. Avoid using silicone-based sealants, as they can degrade over time and are difficult to remove.
- Screws (if needed): If the existing screws are damaged or corroded, purchase new stainless steel screws of the same size and type.
- Mineral Spirits or a Similar Solvent: For cleaning sealant residue from the roof and the vent flange.
Safety Equipment:
- Gloves: To protect hands from sealant and sharp edges.
- Eye Protection: Safety glasses or goggles to prevent debris from entering the eyes.
- Appropriate Footwear: Non-slip shoes or boots for safe footing on the RV roof.
Step-by-Step Replacement Procedure
With the correct replacement vent cover, tools, and materials on hand, the replacement process can begin. Follow these steps carefully to ensure a successful and watertight installation.
Step 1: Safely Access the RV Roof: Position the ladder securely against the RV and carefully climb onto the roof. Ensure the ladder is stable and will not slip. It may be necessary to have someone spot the ladder while you are on the roof.
Step 2: Remove the Old Vent Cover: Using a screwdriver or drill, remove the screws securing the old vent cover to the vent flange. Save the screws if they are in good condition; otherwise, discard them. Once the screws are removed, carefully detach the old vent cover. This may involve sliding it off rails or unhinging it, depending on the vent style.
Step 3: Clean the Vent Flange: Thoroughly clean the vent flange using a putty knife or scraper to remove any old sealant or caulk. Be careful not to damage the flange during this process. Use mineral spirits or a similar solvent to remove any remaining sealant residue. Clean the surface with a brush or sponge and mild detergent to ensure it is free of dirt and debris. A clean surface is essential for proper sealant adhesion.
Step 4: Apply New Sealant: Apply a generous bead of RV-specific sealant around the perimeter of the vent flange. Follow the manufacturer's instructions for the specific sealant being used. If using self-leveling lap sealant, apply it evenly around the flange. If using butyl tape, apply it to the underside of the vent flange before positioning it on the roof.
Step 5: Install the New Vent Cover: Carefully position the new vent cover onto the vent flange, ensuring it aligns properly with the screw holes. Press the cover firmly onto the flange to ensure good contact with the sealant. Install new or previously saved screws after the new cover is seated properly.
Step 6: Secure the Vent Cover: Secure the vent cover to the flange using the screws. Tighten the screws evenly to prevent warping or cracking the cover. Do not overtighten the screws, as this can damage the cover or the flange. Once all screws are in place, visually inspect that the vent cover is securely mounted to the vent flange.
Step 7: Apply Additional Sealant (as needed): Apply an additional bead of sealant around the edges of the vent cover where it meets the vent flange. This will provide an additional layer of protection against water intrusion. Smooth the sealant with a finger or a tool to create a clean and professional finish.
Step 8: Inspect the Installation: Carefully inspect the installation to ensure that the vent cover is securely attached to the flange and that there are no gaps or areas where water could potentially enter. Check the operation of the vent cover to ensure it opens and closes smoothly. It may be necessary to examine the interior of the RV bathroom to confirm that there is no evidence of water intrusion.
Step 9: Dispose of Old Materials and Clean Up: Dispose of the old vent cover, used sealant, and any other waste materials properly. Clean up any debris from the RV roof and the surrounding area. Remove the ladder and store it safely.
Following these steps carefully will help ensure a successful replacement of the RV bathroom vent cover, protecting the RV from water damage and maintaining a comfortable and healthy interior environment.

Replace Broken Trailer Rv Roof Vent Cap

How To Correctly Install Replace Rv Vent Fan

How To Replace Rv Vent With Fan And Upgrade Lighting

Replace An Rv Vent Cover What You Need To Know First

How To Replace Rv Vent With Fan And Upgrade Lighting

Diy Vent Lid Replacement

14 Rv Roof Vent Cover Universal Waterproof Lid Replacement For Camper Trailer Motorhome White 2 Pack

How To Replace An Rv Roof Vent With Gorilla Glue Waterproof Patch And Seal A Giveaway Little Vintage Cottage

3pcs Black Replacement Roof Vent Cover Lid 14 X For Camper Rv Trailer

Unbranded Air Vent Covers Rv Bathroom Ventilation Toilet Camper Cap Replacement
See Also