How To Take Bathroom Faucet Off
The bathroom faucet is one of the most used fixtures in the home, and over time it can start to show signs of wear and tear. If you're having problems with your bathroom faucet, one of the first things you'll need to do is take it off so you can inspect it and make repairs. Here are the steps on how to take bathroom faucet off:
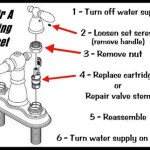
1. Shut off the water supply. The first thing you need to do is shut off the water supply to the bathroom faucet. This will prevent water from leaking out when you remove the faucet.
2. Remove the aerator. The aerator is the small screen that screws onto the end of the faucet. It helps to aerate the water, which makes it feel softer and more refreshing. To remove the aerator, simply unscrew it by hand. If it's stuck, you can use a pair of pliers to gently loosen it.
3. Remove the handles. The handles are the knobs or levers that you use to turn on and off the water. To remove the handles, you'll need to use a screwdriver to remove the screws that hold them in place. Once the screws are removed, you can simply pull the handles off.
4. Disconnect the water lines. The water lines are the flexible tubes that connect the faucet to the water supply. To disconnect the water lines, simply use a wrench to loosen the nuts that hold them in place. Once the nuts are loose, you can pull the water lines off.
5. Remove the mounting nuts. The mounting nuts are the nuts that hold the faucet in place. To remove the mounting nuts, you'll need to use a wrench to loosen them. Once the mounting nuts are loose, you can lift the faucet off of the sink.
6. Inspect the faucet and make repairs. Once you have the faucet off, you can inspect it to see what's wrong. If the faucet is leaking, you may need to replace the O-rings or washers. If the faucet is clogged, you may need to clean the aerator or the water lines.
7. Reassemble the faucet. Once you've made the necessary repairs, you can reassemble the faucet. To do this, simply follow the steps in reverse order. First, put the mounting nuts back on and tighten them. Then, connect the water lines and tighten the nuts. Next, put the handles back on and tighten the screws. Finally, screw on the aerator.
8. Turn on the water supply and test the faucet. Once you've reassembled the faucet, turn on the water supply and test the faucet to make sure it's working properly. If the faucet is still leaking, you may need to tighten the mounting nuts or the water lines.

How To Remove Bathroom Faucet Easy Simple

How To Replace A Bathroom Faucet Home Repair Tutor

How To Replace A Bathroom Faucet Removal And Installation

How To Remove A Bathroom Faucet

How To Replace A Bathroom Faucet Tinged Blue

How To Fix A Bathroom Faucet 14 Steps

How To Remove A Bathroom Faucet

How To Fix A Leaking Faucet Without In The Handle Moen

How Do I Replace Bathroom Sink Faucet Handles

Fixing The Faucet
See Also


