How to Stop a Leaking Faucet in the Bathroom
A leaky faucet in the bathroom can be a constant annoyance, leading to wasted water, higher utility bills, and even potential damage to your bathroom fixtures. Fortunately, many common faucet leaks can be repaired with a few basic tools and some simple steps. This article will guide you through the process of identifying the source of the leak, gathering the necessary materials, and performing the repair.
Identify the Source of the Leak
The first step in stopping a leaky faucet is determining the source of the leak. A dripping faucet may indicate a worn-out washer, a loose packing nut, or a problem with the cartridge or valve stem. Here's how to identify the leak's origin:
- Check for dripping: Observe the faucet closely. Does the water drip from the spout, the handle, or the base of the faucet?
- Listen for leaks: Even if you don't see any water droplets, listen carefully for a faint dripping sound. This might indicate a leak within the faucet's internal components.
- Inspect the faucet: Look for signs of wear and tear, corrosion, or loose parts. Any visible issues can point to the source of the leak.
Once you've identified the source of the leak, you can gather the necessary tools and materials to proceed with the repair.
Gather the Necessary Tools and Materials
The specific tools and materials you'll need will vary depending on the type of faucet and the cause of the leak. However, some common items include:
- Adjustable wrench: Useful for tightening or loosening nuts and bolts.
- Channel-lock pliers: Help grip and turn stubborn fittings.
- Screwdriver: For removing and replacing screws.
- Replacement washer or O-ring: These are common culprits in leaky faucets. You may need to purchase these specifically for your faucet model.
- Packing nut: Depending on the faucet type, a new packing nut might be needed.
- Cartridge or valve stem: If these components are faulty, you'll need to replace them.
- Plumber's tape (Teflon tape): Prevents leaks at threaded connections.
- Gloves: Protect your hands from dirt and grime.
- Safety glasses: Shield your eyes from debris.
- Bucket or towels: To catch any water that spills during the repair process.
Before you begin the repair process, be sure to turn off the water supply to the faucet. This can usually be done by turning the shut-off valve located under the sink or on the water pipe leading to the faucet.
Repairing a Leaky Faucet
Here's a step-by-step guide to repairing a leaky faucet based on different types of leaks:
Replacing a Worn-Out Washer
This is the most common repair for a dripping faucet. The washer is a small rubber or plastic disc that seals the faucet when it's turned off. Here's the process:
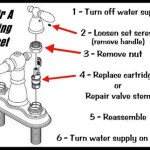
- Remove the faucet handle: Use a screwdriver to remove the screw holding the handle in place. Depending on the handle, you might need to gently pry it off.
- Remove the packing nut: The packing nut sits under the handle and holds the stem in place. Use an adjustable wrench to unscrew the packing nut.
- Remove the stem: With the packing nut off, pull the stem out of the faucet body. The old washer will likely be attached to the stem.
- Replace the washer: Install a new washer on the stem. Make sure the washer is the correct size and material for your faucet.
- Reassemble the faucet: Reverse the steps to reassemble the faucet, making sure to tighten all nuts and screws securely.
Tightening the Packing Nut
If the washer appears to be in good condition, the leaking might be due to a loose packing nut. This can be remedied by tightening the packing nut with the adjustable wrench.
Replacing the Cartridge or Valve Stem
If the faucet continues to leak after replacing the washer or tightening the packing nut, the problem might lie within the cartridge or valve stem. This will require replacing these components, which can be complex depending on the faucet type.
- Identify the cartridge or valve stem: Consult your faucet's user manual or look for specific information online to identify the correct part based on your model.
- Remove the old cartridge or stem: This process can vary depending on the faucet design, so refer to the manufacturer's instructions.
- Install the new cartridge or stem: Ensure the new part is correctly oriented, and then gently tighten it into place.
- Test the faucet: Turn the water supply back on and test the faucet thoroughly to ensure the leak is fixed.
If you're unsure about any step in the repair process or your faucet continues to leak after attempting these repairs, it's best to consult a qualified plumber.

How To Fix A Leaking Bathtub Faucet Diy Family Handyman

How To Fix A Dripping Bathroom Faucet

How To Fix A Leaking Bathtub Faucet The Home

How To Fix A Leaky Faucet Guides For Every Design And Style

How To Fix A Leaking Bathtub Faucet The Home

Properly Fixing A Leaky Sink Faucet Wallside Windows

How To Fix A Bathroom Faucet 14 Steps

12 Ways To Stop A Leaking Faucet Beyond Wow Plumbing

How To Fix A Leaking Bathtub Faucet The Home

How To Fix A Leaky Faucet Guides For Every Design And Style


