How to Stop a Dripping Bathroom Faucet
A dripping bathroom faucet is more than just an annoying sound. It can waste hundreds of gallons of water each year, driving up your water bill and contributing to water scarcity. Additionally, a dripping faucet can indicate a more significant plumbing issue that could lead to costly repairs down the line. Fortunately, stopping a dripping bathroom faucet is often a simple DIY task that can be completed with basic tools and a little patience.
Step 1: Identify the Type of Faucet
The first step in fixing a dripping faucet is identifying the type of faucet you have. There are two main types: compression faucets and cartridge faucets. Compression faucets have two handles, one for hot and one for cold water. They operate by using a washer to stop the flow of water. Cartridge faucets, on the other hand, have a single handle that controls both hot and cold water. They use a cartridge, a small cylindrical component, to regulate water flow.
Knowing the type of faucet you have will help you determine the appropriate repair method. For compression faucets, you'll likely need to replace the washer. For cartridge faucets, you may need to replace the cartridge itself or clean it if it's simply clogged.
Step 2: Gather the Necessary Tools
Once you know the type of faucet you have, you can gather the necessary tools. For basic repairs, you will likely need:
- A pair of adjustable pliers
- A screwdriver
- A wrench
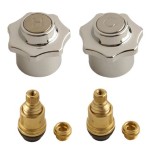
- A replacement washer (for compression faucets)
- A replacement cartridge (for cartridge faucets)
- Teflon tape
- A bucket to catch any water that may spill
If you are unsure about the specific tools you need or if you plan on replacing the entire faucet, consult the user manual or seek professional advice.
Step 3: Turn Off the Water Supply
Before you begin any repairs, it is crucial to shut off the water supply to the faucet. This can be done by turning the valve located behind the faucet, usually on the wall or under the sink. Turn the valve clockwise to shut off the water flow. Once the water has stopped flowing, open the faucet completely to drain any remaining water from the pipes.
Step 4: Remove the Faucet Handle
The next step involves removing the faucet handle. For compression faucets, this usually involves unscrewing a screw located on the top or side of the handle. For cartridge faucets, the handle may be held in place by a small set screw or a decorative cap that needs to be removed first. Once the handle is removed, you will be able to access the valve stem or the cartridge, depending on the type of faucet.
Step 5: Repair or Replace Parts
This is where the specific repair method depends on the type of faucet. For compression faucets, you will need to remove the valve stem and replace the washer located at its end. For cartridge faucets, you may need to remove the entire cartridge and replace it with a new one. If you're dealing with a simple clog, you can try cleaning the old cartridge by soaking it in vinegar for a few hours.
When replacing parts, be sure to use new Teflon tape on the threads of the valve stem or cartridge to prevent leaks. Apply the tape in a clockwise direction, overlapping each wrap by about half the width of the tape.
Step 6: Reassemble the Faucet
After replacing or cleaning the necessary parts, reassemble the faucet in reverse order. Make sure the valve stem or cartridge is properly seated and tightened securely. Replace the handle and ensure it turns smoothly without any resistance. Finally, turn the water supply back on and check for any leaks.
If you find any leaks, repeat the previous steps, carefully inspecting for any loose connections or improperly installed parts. If you are unable to fix the leak yourself, consult a professional plumber.
By following these steps, you can effectively stop a dripping bathroom faucet and prevent unnecessary water wastage. Remember to always prioritize safety by turning off the water supply before starting any repairs and consult a professional for any repairs you are unsure about.

How To Fix A Bathroom Faucet 14 Steps

How To Fix A Bathroom Faucet 14 Steps

Part 1 Of 2 How To Fix A Dripping Faucet

How To Fix A Leaking Bathtub Faucet Diy Family Handyman

How To Fix A Leaking Bathtub Faucet The Home

5 Reasons Your Faucet Is Dripping Water How To Fix It

Simple Ways To Fix A Leaky Delta Bathroom Sink Faucet

How To Fix A Dripping Bathroom Faucet

How To Fix A Leaky Faucet Guides For Every Design And Style

How To Fix A Leaking Bathtub Faucet The Home


