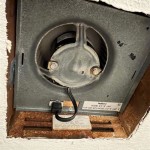
How to Replace a Bathroom Vent Fan
A well-functioning vent fan is essential for maintaining a healthy and comfortable bathroom environment by removing moisture and odors. Over time, vent fans can malfunction or become outdated, making it necessary to replace them. Here's a comprehensive guide on how to successfully replace a bathroom vent fan.
Step 1: Safety Precautions
Before beginning any electrical work, turn off the power to the bathroom at the circuit breaker panel. Cover the floor with a drop cloth to protect it from debris.
Step 2: Remove Old Vent Fan
Locate the vent fan in the ceiling or wall of the bathroom. Remove the screws holding the vent fan grill in place. Once the grill is removed, disconnect the electrical wires connecting the fan to the power supply. Carefully pull the vent fan out of the housing.
Step 3: Install New Vent Fan
Inspect the housing for any debris or damage. If necessary, clean or repair the housing. Place the new vent fan in the housing and secure it with screws. Note the orientation of the fan blades to ensure proper airflow.
Step 4: Connect Electrical Wiring
Connect the electrical wires of the new vent fan to the corresponding wires in the housing. Typically, black wires connect to black wires, white wires connect to white wires, and green or bare wires connect to ground wires. Secure the wire connections with wire nuts and push them back into the housing.
Step 5: Install Vent Fan Grill
Position the vent fan grill over the housing and secure it with screws. Ensure that the grill is properly aligned and covers the housing.
Step 6: Seal Vent Fan
Apply a bead of silicone sealant around the edges of the vent fan grill to create an airtight seal. This will prevent moisture from entering the ceiling or wall cavity.
Step 7: Restore Power
Return to the circuit breaker panel and turn the power back on to the bathroom. Test the vent fan by turning it on and checking for proper airflow.
Tips for Choosing a New Vent Fan
* CFM (cubic feet per minute): Choose a vent fan with a CFM rating that is appropriate for the size of your bathroom. A general rule of thumb is to select a fan with a CFM rating of at least 1 CFM per square foot of bathroom space. * Noise Level: Consider the noise level of the vent fan. Opt for a fan with a lower sone rating for a quieter operation. * Humidity Sensor: Some vent fans come with a built-in humidity sensor that automatically turns the fan on when humidity levels rise. This feature can help prevent mold and mildew growth. * Timer: A timer feature allows the vent fan to run for a set period after you leave the bathroom, ensuring proper ventilation. * Energy Efficiency: Look for vent fans with an Energy Star rating to save on energy consumption.Troubleshooting Tips
* Vent fan not turning on: Check if the vent fan is properly connected to the electrical supply, if the circuit breaker has tripped, or if the fan motor has failed. * Poor airflow: The vent fan may be clogged with dust or debris, the ductwork may be blocked, or the fan may be too small for the bathroom. * Loud noises: The vent fan may be unbalanced, the fan blades may be rubbing against the housing, or the fan motor may be failing. Replacing a bathroom vent fan may seem daunting, but by following these steps and taking necessary safety precautions, you can successfully complete the task and enjoy a well-ventilated and healthier bathroom environment.
Install A New Bathroom Vent Fan Light

Installing A Bathroom Fan Fine Homebuilding

How To Correctly Install Replace Rv Vent Fan

Quick Tip 23 Fixing A Drip At The Bathroom Fan Misterfix It Com

How To Replace A Bathroom Exhaust Fan Stanley Tools

How To Install A Bathroom Fan Step By Guide Bob Vila

How To Install Clean A Bathroom Fan

How To Install A Bathroom Fan Diy Family Handyman

Remove Install A Bathroom Fan Grille In 1 Min

How To Install A Bathroom Fan Homeserve Usa
See Also


