How to Put a Bathroom in a Basement: A Comprehensive Guide
Adding a bathroom to a basement can significantly increase a home's value and functionality. It transforms an underutilized space into a comfortable and practical living area. However, installing a basement bathroom presents unique challenges not encountered in above-ground construction. This guide provides a detailed overview of the necessary steps involved in successfully adding a bathroom to a basement.
Evaluating the Existing Plumbing and Drainage
The first critical step is to assess the existing plumbing infrastructure. Determining the location and depth of the main sewer line is paramount. Gravity drainage is the ideal scenario, where wastewater can flow downhill to the main sewer line. If the main sewer line is higher than the planned bathroom drain lines, a sewage ejector pump will be necessary. This pump collects wastewater in a holding tank and then pumps it upwards to the main sewer line. Understanding the existing plumbing layout will inform decisions regarding drain line placement and the need for additional equipment. In addition to the main sewer line, the location of the main water supply line must be identified. This will factor into where you can easily tap into for the new bathroom's water supply.
Consulting with a licensed plumber at this stage is highly recommended. A professional plumber can accurately assess the existing plumbing system, identify potential issues, and provide insights on the most efficient and cost-effective drainage solutions. They can also help determine whether the local plumbing code requires a backwater valve. A backwater valve prevents sewage from flowing back into the basement in the event of a sewer backup. Understanding these factors early in the process will prevent costly rework later. You will also need to consider permits, which typically require a detailed plumbing plan.
Furthermore, consider the material of the existing plumbing. Older homes may have cast iron or galvanized steel pipes, which can be prone to corrosion and may require replacement. Replacing these older pipes with modern materials like PVC or PEX can improve the plumbing system's reliability and longevity. It’s best to do this while the walls are open, rather than having to open them later.
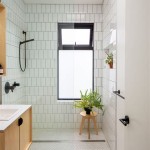
Preparing the Space and Addressing Moisture Issues
Basements are inherently prone to moisture, so addressing any existing or potential water problems is crucial before starting any construction. Inspect the basement walls and floor for signs of water damage, such as efflorescence (a white, powdery substance), mold, or dampness. If water is present, identify the source and take corrective measures. This may involve sealing cracks in the foundation, improving exterior drainage, or installing a sump pump.
Consider applying a waterproof sealant to the basement walls and floor. This will help prevent moisture from seeping through the concrete and damaging the bathroom finishes. Proper ventilation is also essential to prevent moisture buildup and mold growth. Install an exhaust fan in the bathroom to remove humidity during and after showers or baths. Ideally, the exhaust fan should vent directly to the outside.
Framing the bathroom walls and floor also requires special attention. Use pressure-treated lumber for the base plates that come into contact with the concrete floor. This will help prevent rot and decay. Insulating the walls and floor can improve comfort and energy efficiency. Use moisture-resistant insulation materials, such as closed-cell spray foam or rigid foam boards. Leaving an air gap between the insulation and the concrete wall can also help prevent moisture buildup.
When selecting flooring, choose materials that are resistant to moisture, such as ceramic tile, porcelain tile, luxury vinyl plank (LVP), or epoxy. Avoid using materials that are highly susceptible to water damage, such as carpet or solid hardwood. Install a vapor barrier under the flooring to further protect it from moisture. Ensure the room is properly heated, as basements tend to be colder than the rest of the house. Radiant floor heating can be an excellent option for providing comfortable and consistent heat.
Installing Plumbing Fixtures and Electrical Wiring
Once the space is prepared and the plumbing infrastructure is in place, the installation of plumbing fixtures and electrical wiring can begin. The placement of the toilet, sink, and shower or bathtub will depend on the location of the drain lines and water supply lines. Ensure that all fixtures are properly leveled and secured. Use appropriate fittings and connectors to prevent leaks.
Toilet installation typically involves connecting the toilet flange to the drain line and securing the toilet to the flange. Ensure that the toilet is properly caulked to prevent water from seeping under the base. Sink installation involves connecting the drain line to the sink drain and connecting the water supply lines to the faucet. Shower or bathtub installation involves connecting the drain line to the shower or bathtub drain and connecting the water supply lines to the mixing valve. Ensure that the shower or bathtub is properly sealed to prevent water from leaking into the surrounding walls and floor.
Electrical wiring must comply with local electrical codes. Install ground fault circuit interrupter (GFCI) outlets in the bathroom to protect against electrical shock. Ensure that all wiring is properly grounded and protected by conduit. Install sufficient lighting to provide adequate illumination. Consider incorporating task lighting around the vanity and shower area. It's advisable to hire a licensed electrician to handle all electrical work to ensure safety and compliance with code.
Consider installing a dedicated circuit for the bathroom to prevent overloading the electrical system. This is especially important if you plan to use high-wattage appliances, such as a hair dryer or space heater. It may be necessary to upgrade the electrical panel to accommodate the additional load. Label all electrical circuits clearly to facilitate troubleshooting and repairs.
Addressing Ventilation and Lighting
Proper ventilation is crucial in a basement bathroom to prevent moisture buildup and mold growth. An exhaust fan is essential, and it should be sized appropriately for the size of the bathroom. The Building Codes often dictate the necessary CFM (cubic feet per minute) for exhaust fans based on the room's square footage. The fan should vent directly to the outside, ideally through a dedicated duct. Avoid venting the fan into the attic or another enclosed space, as this can lead to moisture problems.
Natural light can be limited in basements, so adequate artificial lighting is essential. Incorporate a combination of ambient lighting, task lighting, and accent lighting to create a well-lit and inviting space. Recessed lighting can provide general illumination, while vanity lighting can provide task lighting for grooming. Accent lighting can be used to highlight architectural features or artwork.
Consider using energy-efficient LED lighting to reduce energy consumption and heat output. LED bulbs are available in a variety of color temperatures, allowing you to customize the lighting to suit your preferences. Install dimmer switches to control the brightness of the lights and create different moods. The use of light colors on the walls and ceiling can also help to reflect light and brighten the space.
If possible, consider adding a window to the bathroom to provide natural light and ventilation. This may require cutting through the foundation wall, which can be a complex and costly undertaking. However, the benefits of natural light and ventilation can be significant. Ensure that the window is properly sealed to prevent water leakage. A window also requires an egress, depending on the building codes in your area.
Legal and Permitting Considerations
Before beginning any construction, it is essential to obtain the necessary permits from the local building department. Permit requirements vary depending on the location and the scope of the project. Typically, permits are required for plumbing, electrical, and structural work. The building department will review the plans to ensure that they comply with local building codes. Failing to obtain the necessary permits can result in fines and delays. It may even require undoing some of the work completed.
Be aware of zoning regulations and setback requirements. These regulations may restrict the location and size of the bathroom. For example, there may be restrictions on the proximity of the bathroom to property lines or septic systems. Consult with the local zoning department to ensure compliance with all applicable regulations.
Consider hiring a licensed contractor to handle the permitting process and ensure compliance with building codes. A licensed contractor is familiar with the local regulations and can navigate the permitting process efficiently. They can also ensure that the work is performed to code, reducing the risk of problems down the road.
Keep accurate records of all permits, inspections, and approvals. These records may be required when selling the property. Failure to provide these records can delay the sale or require additional inspections. It is also wise to thoroughly document the entire process of adding a bathroom in a basement with photos and videos. This can be extremely helpful should you need proof of certain work having been done.

How To Add A Bathroom Basement The Easy Way Diy Family Handyman

How To Add A Bathroom Basement The Easy Way Diy Family Handyman

How To Add A Bathroom In Basement From Scratch Framing Exhaust Fan Plumbing Etc

How To Add A Bathroom In Basement From Scratch Framing Exhaust Fan Plumbing Etc

How To Add A Bathroom Basement The Easy Way Diy Family Handyman

How To Plumb A Basement Bathroom Diy Family Handyman

How To Install A Basement Bathroom Awesome Quick Tips By Home Repair Tutor

How To Finish A Basement Bathroom Before And After S

Diy Basement Bathroom Addition From Start To Finish Learn How Add A Your

How To Finish A Basement Bathroom Pex Plumbing