How To Install Tiles In Bathroom
Bathroom tiling represents a significant investment in a home's value and aesthetic appeal. A properly tiled bathroom not only improves the visual presentation but also provides a durable, waterproof surface resistant to moisture and wear. The process, however, requires meticulous planning, precise execution, and a thorough understanding of tiling materials and techniques. This article details the steps involved in successfully installing tiles in a bathroom, ensuring a professional and long-lasting result.
Preparation: Assessing the Space and Gathering Materials
The initial phase of bathroom tiling centers on preparation. This involves a comprehensive assessment of the existing bathroom structure, accurate measurement of the tiling area, and the procurement of all necessary materials and tools. Neglecting this phase can lead to miscalculations, material shortages, and ultimately, a compromised final product.
The first step is to meticulously measure the surfaces to be tiled. Determine the square footage of the floor and walls. Add approximately 10-15% to this figure to account for cuts, breakage, and potential errors. Accurate measurements are critical for calculating the amount of tile and related materials required.
Next, evaluate the condition of the subfloor or wall surfaces. Ensure they are level, clean, and structurally sound. Any existing flooring or wall coverings must be removed down to the original substrate. Repair any imperfections, such as cracks, holes, or unevenness. For floors, a self-leveling compound may be necessary to create a perfectly flat surface. For walls, patching compound can be used to fill holes and smooth out imperfections.
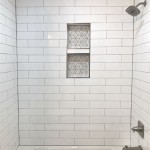
Select the desired tile type, taking into consideration factors such as aesthetics, durability, water resistance, and slip resistance (especially for floors). Common tile options include ceramic, porcelain, glass, and natural stone. Each material possesses unique characteristics that influence its suitability for different bathroom applications. Porcelain tiles, for example, are known for their high water resistance and durability, making them suitable for floors and shower walls.
Acquire the necessary materials, including: tiles, thin-set mortar, grout, tile spacers, sealant, and cleaning supplies. The type of thin-set mortar and grout should be compatible with the chosen tile material and the bathroom environment. For example, epoxy grout is highly resistant to stains and chemicals, making it ideal for areas prone to moisture exposure.
Gather the required tools: tile cutter (manual or wet saw), notched trowel (size determined by tile size), rubber grout float, sponge, buckets, measuring tape, level, pencil, safety glasses, and gloves. A tile wet saw is particularly useful for making precise cuts on larger tiles or harder materials like porcelain or stone.
Finally, protect the surrounding areas with drop cloths or plastic sheeting to prevent damage from dust, debris, and spills. Proper preparation safeguards the bathroom and streamlines the tiling process.
Application: Installing the Tiles with Precision
The tile installation phase demands precision and adherence to established techniques. A systematic approach ensures consistent spacing, proper bonding, and an aesthetically pleasing final result. Attention to detail at this stage is crucial for preventing future issues such as cracked tiles or water damage.
Before beginning the tiling process, plan the layout of the tiles. Begin by finding the center point of the floor or wall. Snap chalk lines to create a grid that guides the placement of the tiles. This ensures a balanced and symmetrical appearance. Consider the placement of full tiles versus cut tiles, aiming to minimize the number of small or awkward cuts, especially in highly visible areas.
Mix the thin-set mortar according to the manufacturer’s instructions. A properly mixed mortar should have a peanut butter-like consistency. Avoid adding too much water, as this can weaken the bond between the tile and the substrate.
Using the notched trowel, apply a layer of thin-set mortar to a small section of the prepared surface. The size of the notch on the trowel should correspond to the tile size, ensuring adequate mortar coverage. Hold the trowel at a 45-degree angle and create ridges in the mortar to promote adhesion.
Carefully place the tiles onto the mortar, pressing them firmly into place. Use tile spacers to maintain consistent spacing between the tiles. This is crucial for achieving uniform grout lines. Periodically check the tiles with a level to ensure they are even and flush with each other. Adjust the tiles as needed before the mortar begins to set.
For tiles that require cutting, use a tile cutter or wet saw. Measure and mark the cut lines accurately. Exercise caution when using power tools and always wear safety glasses. Smooth the cut edges of the tiles with a tile file or sanding block to prevent sharp edges.
Continue applying mortar and placing tiles, working in small sections at a time. Regularly clean excess mortar from the tile surfaces with a damp sponge. Allow the mortar to cure for the recommended time period, typically 24-48 hours, before proceeding to the next step.
Finishing: Grouting, Sealing, and Cleaning
The final stage of bathroom tiling involves grouting the tile joints, sealing the grout lines, and thoroughly cleaning the tiled surfaces. This process not only enhances the aesthetic appeal of the tiling but also provides essential protection against moisture and stains.
Once the thin-set mortar has fully cured, remove the tile spacers. Ensure that the grout lines are clean and free of any debris. Mix the grout according to the manufacturer’s instructions. The consistency of the grout should be similar to that of the thin-set mortar.
Using a rubber grout float, apply the grout to the tile joints. Work the grout into the joints, ensuring that they are completely filled. Hold the grout float at a 45-degree angle and apply pressure to force the grout into the spaces. Remove excess grout from the tile surfaces with the edge of the float.
Allow the grout to set for a short period of time, typically 15-30 minutes. Then, use a damp sponge to wipe away the excess grout from the tile surfaces. Rinse the sponge frequently in clean water. Be careful not to remove too much grout from the joints.
After the grout has partially hardened, use a grout sponge to smooth the grout lines. This creates a professional, uniform appearance. Allow the grout to cure completely, typically 24-72 hours, before applying a sealant.
Apply a grout sealant to the grout lines to protect them from moisture and stains. Follow the manufacturer’s instructions for application. Apply the sealant evenly and allow it to dry completely. This step is especially important in areas prone to water exposure, such as shower walls and floors.
Finally, thoroughly clean the tiled surfaces with a mild detergent and water. Remove any remaining grout haze or residue. Inspect the tiling for any imperfections and make any necessary touch-ups. With proper preparation, careful application, and meticulous finishing, a professionally tiled bathroom will provide years of beauty and functionality.

How To Lay Tile Install A Ceramic Floor In The Bathroom Diy

Installing Tile On Shower Bathtub Walls The Complete Guide

Small Bathroom Tile Upgrade How To

Part 1 How To Install Tile On Shower Tub Wall Step By

How To Install Tile On The Bathroom Wall Step By

How To Install Wall Tile In Bathroom Howtospecialist Build Step By Diy Plans

How To Install A Shower Tile Wall Bathroom

Learn How To Layout Bathroom Floor Tile

Bathroom Floor Tile Layout In 5 Easy Steps Diytileguy

Laying Floor Tiles In A Small Bathroom Houseful Of Handmade