How to Install A Fan in the Bathroom
Installing a bathroom fan is an excellent way to improve air quality and prevent mold and mildew growth. Bathroom fans exhaust moist air, odors, and pollutants from the room, creating a healthier and more comfortable environment. Installing a bathroom fan is a relatively simple project that can be completed in a few hours with basic tools.
Materials you will need:
- Bathroom fan
- Ducting
- Electrical wire
- Wire nuts
- Screwdriver
- Drill
- Saw
- Caulk
Step 1: Choose the Right Fan
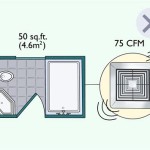
The first step is to choose the right fan for your bathroom. Fans are rated by their CFM (cubic feet per minute) of airflow. The CFM required for your bathroom will depend on the size of the room. A good rule of thumb is to choose a fan that is rated for at least 1 CFM per square foot of floor space.
Step 2: Plan the Layout
Once you have chosen a fan, you need to plan the layout of the installation. The fan should be installed in the ceiling or wall, as close to the shower or bathtub as possible. You will also need to plan the location of the ductwork. The ductwork should be as short and straight as possible.
Step 3: Cut the Hole
Once you have planned the layout, you need to cut the hole for the fan. The hole should be the same size as the fan housing. Use a saw to cut the hole.
Step 4: Install the Fan
Next, you need to install the fan. Insert the fan into the hole and secure it with screws. Make sure that the fan is level.
Step 5: Connect the Ductwork
Now, you need to connect the ductwork to the fan. The ductwork should be attached to the fan housing with duct tape. Make sure that the ductwork is sealed tightly.
Step 6: Wire the Fan
Next, you need to wire the fan. The fan should be wired to a dedicated circuit. Connect the black wire from the fan to the black wire from the circuit. Connect the white wire from the fan to the white wire from the circuit. Connect the ground wire from the fan to the ground wire from the circuit.
Step 7: Test the Fan
Finally, you need to test the fan. Turn on the fan and make sure that it is working properly. The fan should exhaust air from the room.
Step 8: Caulk the Fan
Once you have tested the fan, you need to caulk around the edges of the fan housing. This will help to seal the fan and prevent air leaks.
Installing a bathroom fan is a relatively simple project that can be completed in a few hours. By following these steps, you can ensure that your bathroom fan is installed properly and is working efficiently.

Installing A Bathroom Fan Fine Homebuilding

How To Install A Bathroom Exhaust Fan Broan 688

How To Replace And Install A Bathroom Exhaust Fan From Start Finish For Beginners Easy Diy

Install A New Bathroom Vent Fan Light

How To Install A Bathroom Exhaust Fan

How To Replace And Install A Bathroom Exhaust Fan From Start Finish For Beginners Easy Diy

How To Install A Bathroom Exhaust Fan

How To Install A Bathroom Fan

How To Install A Bathroom Exhaust Fan

How To Install A Bathroom Fan Diy Step By Guide


