How To Fix A Moen Bathroom Faucet
Moen bathroom faucets are known for their durability and style. However, even the best faucets can develop problems over time. If your Moen bathroom faucet is leaking, dripping, or not working properly, there are a few things you can do to try to fix it yourself before calling a plumber. Here are some step-by-step instructions on how to fix a Moen bathroom faucet.
Step 1: Gather Your Tools
Before you begin, you will need to gather a few tools. These include a Phillips head screwdriver, a flat head screwdriver, a pair of pliers, and a wrench. You may also need a new faucet cartridge, if the cartridge is the cause of the problem.
Step 2: Turn Off the Water Supply
Once you have your tools, the first step is to turn off the water supply to the faucet. There are usually two shut-off valves under the sink, one for the hot water and one for the cold water. Turn both valves clockwise to turn off the water.
Step 3: Remove the Handle
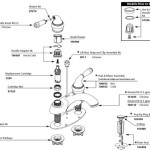
Once the water is turned off, you can remove the handle. Most Moen bathroom faucets have a small set screw on the underside of the handle. Use a Phillips head screwdriver to remove the set screw, then pull the handle straight up to remove it.
Step 4: Remove the Cartridge
Once the handle is removed, you will see the cartridge. The cartridge is held in place by a retaining nut. Use a wrench to loosen the retaining nut, then pull the cartridge straight out of the faucet body.
Step 5: Inspect the Cartridge
Once you have removed the cartridge, inspect it for damage. If the cartridge is damaged, it will need to be replaced. You can purchase a new cartridge at most hardware stores or home improvement centers.
Step 6: Install the New Cartridge
If the cartridge is not damaged, you can reinstall it. To do this, simply insert the cartridge into the faucet body and tighten the retaining nut. Be sure to tighten the retaining nut securely, but do not overtighten it.
Step 7: Reinstall the Handle
Once the cartridge is installed, you can reinstall the handle. To do this, simply align the handle with the splines on the cartridge and push it down until it clicks into place. Then, use a Phillips head screwdriver to tighten the set screw.
Step 8: Turn on the Water Supply
Once the handle is installed, you can turn on the water supply. Check for leaks around the handle and the base of the faucet. If there are no leaks, then your faucet is repaired.
Additional Tips
If you are unable to fix the faucet yourself, you may need to call a plumber. However, by following these step-by-step instructions, you may be able to save yourself the cost of a plumber.
Here are a few additional tips for fixing a Moen bathroom faucet:
- If the faucet is leaking from the base, it may be necessary to replace the O-rings.
- If the faucet is dripping from the spout, it may be necessary to replace the aerator.
- If the faucet is not working properly, it may be necessary to replace the solenoid.
By following these tips, you can keep your Moen bathroom faucet working properly for years to come.

How To Fix A Dripping Moen Faucet Howtolou Com

How To Fix A Dripping Moen Faucet Howtolou Com

How Do I Replace My Moen Bathroom Faucet Cartridge

How To Fix A Leaky Moen Faucet Fast And Easy Cartridge Replacement

How To Remove Moen Bathroom Faucet Handle In 2 Steps

Moen Faucet Handle Keeps Twisting Out Of Position

How To Fix Moen Single Handle Faucets

How To Fix Moen Single Handle Faucets

Moen Bathroom Faucet Repair 1225

How To Install A Moen Centerset Faucet


