How To Fix A Dripping Bathroom Faucet
A dripping bathroom faucet is not only annoying, but it can also waste a lot of water and increase your water bill. If you're tired of dealing with a leaky faucet, then it's time to take action and fix it. Here are some easy steps on how to fix a dripping bathroom faucet:
Identify the Type of Faucet
The first step is to identify the type of faucet you have. There are two main types of faucets: compression faucets and cartridge faucets. Compression faucets have a washer that seals the water flow, while cartridge faucets use a cartridge to control the water flow. Once you know the type of faucet you have, you can purchase the correct parts to fix it.
Gather Your Tools
Once you have identified the type of faucet you have, you will need to gather the necessary tools to fix it. For compression faucets, you will need a wrench and a screwdriver. For cartridge faucets, you will need a wrench, a screwdriver, and a cartridge puller. You may also need some replacement parts, such as a washer or a cartridge.
Turn Off the Water Supply
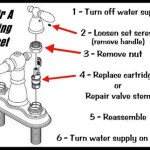
Before you start working on the faucet, you need to turn off the water supply. This will prevent water from leaking out of the faucet while you are working on it. To turn off the water supply, locate the water shut-off valves under the sink. Turn the valves clockwise to close them.
Remove the Aerator
If your faucet has an aerator, you will need to remove it before you can access the internal parts of the faucet. To remove the aerator, unscrew it counterclockwise. Be careful not to drop the aerator down the drain.
Disassemble the Faucet
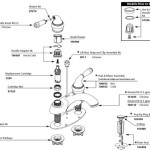
Once you have removed the aerator, you can disassemble the faucet. For compression faucets, you will need to remove the handle, the packing nut, and the washer. For cartridge faucets, you will need to remove the handle, the cap, and the cartridge.
Replace the Worn Parts
Once you have disassembled the faucet, you will need to replace the worn parts. For compression faucets, you will need to replace the washer. For cartridge faucets, you will need to replace the cartridge. When replacing the parts, be sure to use the correct size and type of parts.
Reassemble the Faucet
Once you have replaced the worn parts, you can reassemble the faucet. For compression faucets, you will need to reattach the washer, the packing nut, and the handle. For cartridge faucets, you will need to reattach the cartridge, the cap, and the handle.
Turn On the Water Supply
Once you have reassembled the faucet, you can turn on the water supply. Open the water shut-off valves under the sink and allow the water to run through the faucet. Check for any leaks. If there are no leaks, then you have successfully fixed the dripping bathroom faucet.
Tips for Preventing Future Drips
Here are a few tips to help prevent future drips from your bathroom faucet:
- Keep the faucet clean. Build-up of dirt and debris can cause the faucet to leak.
- Lubricate the moving parts of the faucet regularly. This will help to keep the faucet working smoothly and prevent leaks.
- Replace the washer or cartridge in the faucet regularly. Washers and cartridges can wear out over time and cause the faucet to leak.
- If you have a leaky faucet, don't ignore it. Fix it as soon as possible to prevent water damage and wasted water.

How To Fix A Bathroom Faucet 14 Steps

How To Fix A Bathroom Faucet 14 Steps

Part 1 Of 2 How To Fix A Dripping Faucet

How To Fix A Leaky Faucet Guides For Every Design And Style

How To Fix A Leaking Bathtub Faucet Diy Family Handyman

Sink Faucet Repair Delta Bathroom Drips

How To Fix A Leaky Faucet The Home

How To Fix A Dripping Moen Faucet Howtolou Com

Simple Ways To Fix A Leaky Delta Bathroom Sink Faucet

How To Fix A Leaking Bathroom Faucet Quit That Drip


