Changing Moen Bathroom Faucet Cartridge
Moen faucets are known for their durability and reliability, but even the best faucets can develop problems over time. One common issue is a leaky cartridge. A cartridge is a small, replaceable part that controls the flow of water in the faucet. If the cartridge is worn or damaged, it can cause the faucet to leak.
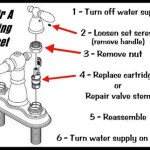
Replacing a Moen bathroom faucet cartridge is a relatively simple task that can be completed in about 30 minutes. Here are the steps on how to do it:
1. Gather your tools and materials.
You will need the following tools and materials to replace a Moen bathroom faucet cartridge:
*2. Turn off the water supply.
The first step is to turn off the water supply to the faucet. There are usually two shut-off valves under the sink, one for the hot water and one for the cold water. Turn both valves clockwise to close them.
3. Remove the faucet handle.
Once the water supply is turned off, you can remove the faucet handle. On most Moen faucets, the handle is held in place by a small screw. Use a Phillips head screwdriver to remove the screw, then pull the handle straight up to remove it.
4. Remove the cartridge retainer nut.
Once the handle is removed, you will see the cartridge retainer nut. This nut is usually made of plastic and has a large, round head. Use an adjustable wrench to loosen the nut, then remove it by hand.
5. Remove the old cartridge.
Once the cartridge retainer nut is removed, you can remove the old cartridge. Grip the cartridge with your hand and pull it straight up to remove it.
6. Apply plumber's grease to the new cartridge.
Before you install the new cartridge, apply a thin layer of plumber's grease to the O-rings. This will help to create a watertight seal and prevent leaks.
7. Install the new cartridge.
Insert the new cartridge into the faucet body and push it down until it is fully seated. Make sure that the O-rings are properly aligned.
8. Install the cartridge retainer nut.
Once the new cartridge is installed, thread the cartridge retainer nut back onto the faucet body. Tighten the nut until it is snug, but do not overtighten it.
9. Reinstall the faucet handle.
Finally, reinstall the faucet handle. Insert the handle into the faucet body and push it down until it is fully seated. Then, insert the screw and tighten it using a Phillips head screwdriver.
10. Turn on the water supply.
Once the faucet handle is reinstalled, turn on the water supply and check for leaks. If there are any leaks, tighten the cartridge retainer nut or the faucet handle until the leaks stop.
Replacing a Moen bathroom faucet cartridge is a relatively simple task that can be completed in about 30 minutes. By following the steps above, you can easily fix a leaky faucet and restore it to working order.

Bathroom Faucet Cartridge Replacement

How To Replace Repair A Leaky Moen Cartridge In Bathroom Set Of Faucets Single Lever Tips

How Do I Replace My Moen Bathroom Faucet Cartridge

Moen Cartridges

How To Fix A Dripping Moen Faucet Howtolou Com

How To Repair Remove Replace A Leaking Moen Shower Faucet Cartridge Valve With Single Knob 1225

Replace A Moen Kitchen Faucet Cartridge

Moen 2 Handle Replacement Cartridge For Roman Tub Faucets 1248 The Home

Fast Leaky Faucet Fix Moen 1225 Cartridge Replacement

Which Moen Cartridge Do I Need


