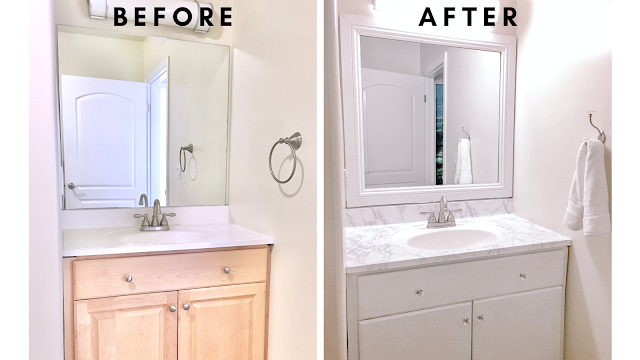
Before and After Painted Bathroom Cabinets
Bathroom cabinets are often overlooked when it comes to home décor, but they can make a big impact on the overall look and feel of the space. If your bathroom cabinets are looking tired, outdated, or just plain boring, painting them is a great way to give them a fresh new look. In this article, we will take you through the steps of painting bathroom cabinets, from preparing the surface to applying the paint. We will also provide you with some tips and tricks for getting a professional-looking finish.
Before You Start
Before you start painting your bathroom cabinets, there are a few things to keep in mind. First, make sure that the cabinets are in good condition. If the cabinets are damaged or have any major flaws, you will need to repair them before you paint. Second, choose a paint that is specifically designed for bathroom use. Bathroom paint is more resistant to moisture and mildew than regular paint, which is important in a humid environment like a bathroom. Finally, make sure that you have all of the necessary supplies before you start painting. These supplies include:
- A paintbrush
- A roller
- A paint tray
- A drop cloth
- Painter's tape
- Sandpaper
- A primer
- Paint
- A sealant
Preparing the Surface
The first step in painting bathroom cabinets is to prepare the surface. This involves cleaning the cabinets, sanding them lightly, and then applying a primer. To clean the cabinets, use a mild soap and water solution. Be sure to rinse the cabinets thoroughly and allow them to dry completely before sanding. To sand the cabinets, use a fine-grit sandpaper. Sand lightly, just enough to remove any dirt or debris from the surface. Once the cabinets are sanded, apply a primer. Primer helps to create a smooth surface for the paint to adhere to and also helps to prevent the paint from peeling or chipping.
Applying the Paint
Once the primer has dried, you can start applying the paint. For best results, use a brush for the edges and corners of the cabinets and a roller for the flat surfaces. Be sure to apply thin, even coats of paint. Allow each coat of paint to dry completely before applying the next coat. Once you are satisfied with the coverage, apply a sealant to protect the paint from moisture and mildew.
Tips and Tricks
Here are a few tips and tricks for getting a professional-looking finish when painting bathroom cabinets:
- Use a high-quality paintbrush and roller.
- Apply thin, even coats of paint.
- Allow each coat of paint to dry completely before applying the next coat.
- Seal the paint with a polyurethane sealant to protect it from moisture and mildew.
- If you are painting over a dark color, you may need to apply two or three coats of paint to achieve the desired coverage.
Conclusion
Painting bathroom cabinets is a great way to give them a fresh new look. By following the steps outlined in this article, you can achieve a professional-looking finish that will last for years to come. So if your bathroom cabinets are looking tired, outdated, or just plain boring, don't wait any longer to give them a fresh coat of paint.

Pin Page

Chalk Painted Bathroom Vanity Makeover Our Storied Home

Painting Bathroom Cabinets Nq Property Care

I Painted Our Wooden Bathroom Vanity What Learned Diy Tips Before Afters

Home How To Repaint A Bathroom Cabinet

Painted Bathroom Vanity Michigan House Update Liz Marie Blog

Diy Easy Bathroom Makeover Transformation Faux Marble Framed Mirror No Paint The Ann

Bathroom Vanity Makeover Cabinet Painting Tutorial Simplyschulze

Pin Page

My 6 00 Vanity Makeover With Latex Paint Lemons Lavender Laundry


