Bathroom Vanity Painting: Before and After
Revamping a bathroom vanity can instantly elevate the entire space, offering a cost-effective way to achieve a refreshed, designer-inspired look. While professional painting services provide exceptional results, it's entirely possible to tackle the project on your own with careful preparation and our expert guidance.
In this comprehensive guide, we'll walk you through the process of bathroom vanity painting, from selecting the right materials to achieving a stunning finish. Prepare to transform your vanity from plain to polished with our step-by-step instructions.
Materials Required:
- Sandpaper (120-grit and 220-grit)
- Wood filler (optional)
- Primer
- Paint (eggshell, satin, or semi-gloss finish recommended)
- Paintbrush or roller
- Painter's tape
- Drop cloths
- Safety glasses
Step 1: Preparation
Before you begin, clear the bathroom, remove all hardware, and protect the surrounding surfaces with painter's tape and drop cloths. Wear safety glasses during the entire process.
Step 2: Sanding
Use 120-grit sandpaper to lightly sand the vanity surface, removing any dirt, debris, or existing finish. Focus on rough spots or imperfections. Once sanded, wipe down the vanity with a damp cloth.
Step 3: Filling Holes
If there are any nail holes or other imperfections, fill them with wood filler according to the manufacturer's instructions. Allow the filler to dry and sand it smooth with 220-grit sandpaper.
Step 4: Priming
Apply a coat of primer to the vanity surface using a paintbrush or roller. Primer creates a smooth, even base for the paint to adhere to, ensuring a professional-looking finish. Allow the primer to dry completely.
Step 5: Painting
Now it's time for the transformation! Apply two thin coats of paint to the vanity, allowing each coat to dry before applying the next. For a long-lasting finish, choose a paint with an eggshell, satin, or semi-gloss finish. These finishes offer durability and resistance to moisture and wear.
Step 6: Hardware and Finishing Touches
Once the paint is dry, reattach the hardware and allow the vanity to cure for a few days before using it. This will ensure optimal adhesion and prevent scratches or smudges.
Before and After: A Visual Transformation
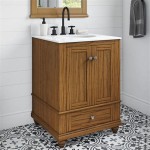
Behold the before and after images of a bathroom vanity after a professional paint job. The results speak volumes about the transformative power of a fresh coat of paint. The once-dated vanity now appears modern, inviting, and brimming with style.
Conclusion
With a little planning and effort, you can transform your bathroom vanity from ordinary to extraordinary. By following the steps outlined above, you'll be able to achieve a professional-looking finish that will add value and style to your home. So, grab your paintbrush, roll up your sleeves, and prepare to embark on a bathroom vanity painting project that will redefine your space.

Bathroom Vanity Makeover With Annie Sloan Chalk Paint

Chalk Painted Bathroom Vanity Makeover Our Storied Home

Painted Bathroom Vanity Michigan House Update Liz Marie Blog

Pin Page

My 6 00 Vanity Makeover With Latex Paint Lemons Lavender Laundry

Painting Bathroom Cabinets Nq Property Care
.jpg?strip=all)
Painting A Bathroom Vanity Again Dream Green Diy

Home How To Repaint A Bathroom Cabinet

Before And After Bathroom Vanity Transformation With Painted Tile Countertop The Minimal Ish Mama

Bathroom Vanity Makeover Cabinet Painting Tutorial Simplyschulze
See Also


