Delta Bathroom Faucet Cartridge Removal
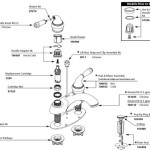
Delta faucets are widely known for their durability and ease of repair. If you're experiencing issues with your Delta bathroom faucet, chances are you can fix it yourself with a few simple steps. One of the most common repairs is replacing the cartridge. The cartridge is a small component that controls the flow of water and temperature. Over time, the cartridge can become worn or damaged, leading to leaks or other problems.
Replacing a Delta bathroom faucet cartridge is a relatively easy task that can be completed in about 30 minutes. Here's a step-by-step guide to help you get started:
Step 1: Gather your tools
You will need the following tools to replace your Delta bathroom faucet cartridge:
- Adjustable wrench
- Phillips head screwdriver
- Allen wrench (if applicable)
- Replacement cartridge
Step 2: Turn off the water supply
Before you begin, turn off the water supply to your bathroom faucet. You can do this by locating the shut-off valves under the sink. Once the water is turned off, open the faucet to release any residual water.
Step 3: Remove the handle
Use the Allen wrench or Phillips head screwdriver to remove the handle from the faucet. There may be a small screw or cap that needs to be removed first. Once the handle is loose, pull it straight up to remove it.
Step 4: Remove the cartridge retainer nut
Using the adjustable wrench, loosen the cartridge retainer nut. The nut is located at the base of the faucet body. Be careful not to over-tighten the nut.
Step 5: Pull out the old cartridge
Once the cartridge retainer nut is loose, you can pull out the old cartridge. The cartridge may be stuck, so you may need to use a little force. Be careful not to damage the cartridge or the faucet body.
Step 6: Insert the new cartridge
Insert the new cartridge into the faucet body. Make sure that the cartridge is properly seated and that the O-rings are in place.
Step 7: Tighten the cartridge retainer nut
Use the adjustable wrench to tighten the cartridge retainer nut. Be careful not to over-tighten the nut.
Step 8: Reinstall the handle
Reinstall the handle onto the faucet. Tighten the handle screw or cap.
Step 9: Turn on the water supply
Turn on the water supply to your bathroom faucet and check for leaks. If there are no leaks, your faucet is now repaired.
Additional tips
- If you are having difficulty removing the old cartridge, you can try using a penetrating oil to loosen it.
- When installing the new cartridge, make sure that the O-rings are properly seated. This will help to prevent leaks.
- If you are still having problems with your Delta bathroom faucet, you can contact Delta customer service for assistance.

Delta Shower Faucet Cartridge Replacement 1700 Monitor Leak Repair

How To Replace The Cartridge In A Single Handle Delta Faucet Repair
Delta Shower Handle Cartridge Replacement Ifixit Repair Guide

Replacing Delta Shower Cartridge

How To Repair A Delta Tub Shower Valve

Delta Bathroom Faucet Cartridge Replacement

Can T Remove Delta Faucet Cartridge

Tutorial Delta Faucet Cartridge Replacement

Cartridge 2 2h Ceramic Stem Rp47422 Delta Faucet
Delta Shower Handle Cartridge Replacement Ifixit Repair Guide
See Also


