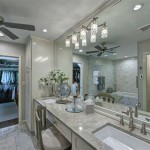
Bathroom With Wainscoting And Tile
Wainscoting and tile are both classic bathroom materials that can add style and sophistication to your space. When combined, they can create a truly stunning look that will be sure to impress your guests. Here are a few tips for using wainscoting and tile in your bathroom:
Choose the Right Materials
The first step is to choose the right materials for your bathroom. For wainscoting, you can choose from a variety of materials, including wood, MDF, and PVC. Wood is the most traditional choice, but it can be expensive and requires more maintenance. MDF is a less expensive option that is also moisture-resistant. PVC is the most affordable option and is also very durable.
For tile, you can choose from a wide variety of materials, including ceramic, porcelain, and natural stone. Ceramic tile is the most affordable option and is available in a wide range of colors and styles. Porcelain tile is more durable than ceramic tile and is also less porous, making it a good choice for bathrooms. Natural stone tile is the most expensive option, but it is also the most durable and beautiful.
Plan the Layout
Once you have chosen the materials for your bathroom, you need to plan the layout. The most common way to install wainscoting in a bathroom is to install it around the bottom of the walls. However, you can also install wainscoting on the entire wall, or even just on the lower half of the wall. You can also use wainscoting to create a border around the bathtub or shower.
When planning the layout of your tile, you need to consider the size and shape of the tile, as well as the overall design of the bathroom. You can use tile to create a variety of patterns, including stripes, checks, and diamonds. You can also use tile to create a mosaic design.
Install the Wainscoting
Once you have planned the layout of your wainscoting, you can begin installing it. The first step is to measure and cut the wainscoting to size. Then, you need to apply adhesive to the back of the wainscoting and press it into place on the wall. You can use a level to make sure that the wainscoting is installed evenly.
Install the Tile
Once the wainscoting has been installed, you can begin installing the tile. The first step is to apply thinset to the wall where you will be installing the tile. Then, you can begin laying the tile, starting from the bottom of the wall and working your way up. You can use a level to make sure that the tile is installed evenly.
Grout the Tile
Once the tile has been installed, you need to grout it. Grout is a type of mortar that is used to fill in the spaces between the tiles. You can choose from a variety of grout colors, including white, gray, and black. To grout the tile, you simply need to apply the grout to the spaces between the tiles and smooth it out with a grout float.
Seal the Tile
Once the grout has dried, you need to seal the tile. This will help to protect the tile from stains and damage. To seal the tile, you simply need to apply a sealant to the tile and let it dry.
Enjoy Your New Bathroom!
Once the tile has been sealed, you can enjoy your new bathroom! Wainscoting and tile are both beautiful and durable materials that will add style and sophistication to your space.
:max_bytes(150000):strip_icc()/258105_9a02f7baa79d43f39f348e84f14d321bmv2-bf26fcec6ed84d3aa3bc5fde7d3af1c4.jpeg?strip=all "30 Bathroom Wainscoting Ideas To Add Character And Charm")
30 Bathroom Wainscoting Ideas To Add Character And Charm

Contemporary Bathroom Tile Wainscoting Centsational Style

Contemporary Bathroom Tile Wainscoting Centsational Style

30 Amazing Wainscoting Bathroom Ideas You Will Love
:max_bytes(150000):strip_icc()/258105_10a28acec8b445feb6fa4d4dd6202d03mv2-71be067559e4453ca58adb5f4731048f.jpeg?strip=all "30 Bathroom Wainscoting Ideas To Add Character And Charm")
30 Bathroom Wainscoting Ideas To Add Character And Charm

Bathroom Wall Trim Ideas Using Wainscoting And Crown Molding The Designery

From Chic To Cozy 25 Bathroom Wainscoting Ideas Curbly

How To Cover Dated Bathroom Tile With Wainscoting

Small Bathroom Makeover Alittlehintofthis Com

29 Small Bathroom Wainscoting Ideas For A Luxurious Space