Replacing a Bathroom Fan Without Attic Access
Replacing a bathroom fan is a common home maintenance task that often becomes necessary due to age, malfunction, or a desire for a quieter or more efficient model. While attic access significantly simplifies the process, many bathrooms lack this convenience. Replacing a bathroom fan without attic access requires careful planning, meticulous execution, and adherence to safety protocols. This article outlines the steps involved in this process, emphasizing techniques and considerations for a successful replacement.
Before initiating any electrical work, prioritize safety. Turn off the power to the bathroom fan circuit at the main electrical panel. Confirm the power is off using a non-contact voltage tester. It is also prudent to wear safety glasses to protect against falling debris. Gather the necessary tools, which typically include a screwdriver set (Phillips and flathead), a drill with various bits, wire connectors, wire stripper/crimper, utility knife, drywall knife or saw, dust mask, and gloves. Ensure the replacement fan is compatible with the existing wiring and the size of the fan housing. Check that the new fan comes with all necessary mounting hardware.
Preparing the Work Area
The initial stage involves preparing the bathroom for the replacement process. Cover the toilet, sink, and other bathroom fixtures with drop cloths or plastic sheeting to protect them from dust and debris generated during the removal and installation. Clear the floor area directly beneath the fan to provide ample workspace. Proper preparation minimizes cleanup and prevents accidental damage to bathroom fixtures.
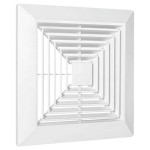
Remove the fan grille. Most bathroom fan grilles are held in place with spring clips or screws. Carefully detach the grille, noting the orientation for reinstallation. Once the grille is removed, use a vacuum cleaner to remove any accumulated dust and debris from the fan housing and surrounding area. This step improves visibility and reduces the risk of inhaling dust particles.
Disconnect the electrical wiring. Before disconnecting any wires, take a photograph of the wiring configuration. This visual record serves as a valuable reference during the reinstallation process, ensuring correct wiring connections. Use a wire stripper/crimper to carefully disconnect the wires, using appropriate wire connectors to cap the exposed ends for safety. This step prevents accidental electrical shock while working on the fan.
Examine the existing fan housing installation. Determine how the fan housing is secured to the ceiling joists. Look for screws, nails, or mounting brackets. If visible, remove these fasteners to loosen the housing. If access to the mounting hardware is limited, proceed cautiously to avoid damaging the ceiling.
Removing the Old Fan
The removal process varies depending on the fan housing design and the absence of attic access. In many cases, the fan housing is attached to the ceiling joists with screws or mounting brackets that are accessible from within the fan housing itself. If the housing is directly screwed into the joists, carefully unscrew it. If mounting brackets are present, detach them from the housing.
If the fan housing is tightly secured and difficult to remove, it might be necessary to enlarge the existing opening slightly. Use a drywall knife or saw to carefully cut away a small amount of the ceiling drywall around the fan housing. Exercise caution to avoid cutting into electrical wiring or plumbing. Only remove enough drywall to allow the fan housing to be maneuvered out of the opening.
Once the fasteners are removed and the opening is slightly enlarged if needed, carefully lower the old fan housing from the ceiling. It is advisable to have an assistant to help support the weight of the fan housing during this process. Once the fan is completely removed, inspect the opening for any obstructions or damage to the surrounding drywall. Clean the area to remove any remaining debris.
If the existing fan included a duct connecting to the vent, detach the duct from the fan housing before complete removal. Note the size and type of duct used to ensure a proper fit with the new fan.
Installing the New Fan
Before installing the new fan, verify its compatibility with the existing ductwork and electrical wiring. Ensure the new fan housing is the same size or slightly smaller than the opening in the ceiling. If the new fan housing is larger, the opening will need to be enlarged accordingly. If the new fan is smaller, shims or filler pieces of drywall may be necessary to close the gaps.
Attach the ductwork to the new fan housing. Use foil tape or clamps to secure the duct to the fan housing, ensuring an airtight seal. A properly sealed duct prevents moisture from leaking into the ceiling cavity. Secure the replacement fan housing into the ceiling. Most new fan housings come with mounting brackets or screws. Use these to attach the housing to the ceiling joists. Ensure the housing is securely fastened and level with the ceiling.
Reconnect the electrical wiring, matching the wiring configuration documented earlier. Use wire connectors to securely connect the wires, ensuring a tight and insulated connection. Double-check the wiring connections to prevent short circuits or other electrical problems. Tuck the wires neatly into the fan housing, ensuring they do not obstruct the fan blades or other moving parts.
Finishing the Installation
After connecting the wiring and securing the fan housing, test the fan. Turn the power back on at the main electrical panel and verify that the fan is operating correctly. Check for any unusual noises or vibrations. If the fan does not operate, turn the power off immediately and re-examine the wiring connections.
Install the fan grille. Align the grille with the fan housing and secure it using the spring clips or screws. Ensure the grille is flush with the ceiling and securely attached. Clean any dust or fingerprints from the grille.
If the opening in the ceiling was enlarged during the removal process, repair the drywall. Use drywall compound to fill any gaps or cracks around the fan housing. Allow the compound to dry completely, then sand it smooth. Paint the repaired area to match the existing ceiling paint.
Clean the bathroom thoroughly, removing any dust, debris, or tools. Inspect the ceiling and surrounding area for any damage or imperfections. Dispose of the old fan and any waste materials responsibly.
Consider the implications of inadequate ventilation. Bathrooms without properly functioning ventilation fans are prone to moisture buildup, which can lead to mold and mildew growth. This can cause health problems and damage to the bathroom fixtures and building materials. Ensure the new fan is properly sized for the bathroom and provides adequate ventilation.
Refer to the fan's manufacturer’s instructions for specific installation guidelines and safety precautions. The provided instructions often contain detailed diagrams and explanations that can assist in the installation process. Adhering to the manufacturer’s recommendations ensures proper operation and longevity of the fan.
Local building codes may dictate specific requirements for bathroom fan installation. Consult local building codes or a qualified electrician to ensure compliance with all applicable regulations. This helps avoid potential fines or safety violations.
Consider replacing the fan with a model that includes a humidity sensor or timer. These features automatically activate the fan when humidity levels are high or after a specified time period, improving ventilation and preventing moisture buildup. Humidity-sensing fans are particularly useful in bathrooms that are frequently used for showering or bathing.
Regular maintenance ensures the longevity of the newly installed fan. Periodically clean the fan grille and housing to remove dust and debris. Listen for any unusual noises or vibrations, and address any problems promptly. A well-maintained fan operates more efficiently and effectively.

How To Install A Bathroom Fan Without Attic Access Atkinson Inspection Services

How To Replace Your Bathroom Fan Quickly With No Attic Access Diy

How To Install A Bathroom Fan Without Attic Access

Make Your Bathroom Fan Like New Without Attic Access

How To Replace Your Bathroom Fan Quickly With No Attic Access Diy

Make Your Bathroom Fan Like New Without Attic Access

Bathroom Exhaust Fan Replacement Upgrade No Attic Access

How To Install A Bathroom Fan Without Attic Access The Ultimate Guide

How To Replace A Bathroom Fan With No Attic Access Repair Maintenance

Bathroom Exhaust Fan Replacement Upgrade No Attic Access