Removing Drain From Bathroom Sink
A bathroom sink drain is an essential component for proper water drainage and maintaining a clean and hygienic bathroom. However, there may come a time when you need to remove the drain for cleaning, repairs, or replacement. In this guide, we'll provide step-by-step instructions on how to safely and effectively remove a drain from a bathroom sink.
Tools and Materials Required
Before you begin, gather the necessary tools and materials:
- Adjustable wrench
- Phillips head screwdriver
- Bucket or basin
- Rags or old towels
- Replacement drain assembly (if necessary)
Safety Precautions
Before removing the drain, take the following safety precautions:
- Turn off the water supply to the sink by closing the shut-off valves beneath the sink.
- Place a bucket or basin under the drain to catch any water or debris that may escape during removal.
- Wear gloves to protect your hands from sharp edges or chemicals.
Step-by-Step Removal Instructions
Now, let's go through the steps to remove the drain:
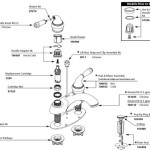
- Remove the Stopper: If your sink has a pop-up drain, simply lift the stopper up to remove it. For other types of drains, use the Phillips head screwdriver to remove any screws securing the stopper.
- Unfasten the Lift Rod: Locate the lift rod, which is a metal rod connected to the stopper. Disconnect it from the stopper by unhooking the end from the loop on the stopper.
- Loosen the Locknut: Using the adjustable wrench, loosen the locknut that is located beneath the sink, securing the drain assembly to the sink.
- Gently Pull Out the Drain: Once the locknut is loose, gently pull the drain assembly out of the sink, being careful not to damage the pipes or surrounding surfaces.
Cleaning and Replacing the Drain
Once you have removed the drain, you can clean it using a mild detergent and water. If the drain is severely clogged or damaged, you may need to replace it with a new one.
To install a new drain, simply reverse the removal steps. Insert the new drain assembly into the sink, tighten the locknut, and reconnect the lift rod and stopper.
Tips and Troubleshooting
- If the locknut is corroded or difficult to loosen, apply a penetrating oil to it and let it sit for a few minutes before trying again.
- Be careful not to overtighten the locknut, as this can damage the drain assembly.
- If you encounter any leaks after reassembling the drain, tighten the connections and check for any damaged or loose parts.
Conclusion
Removing a drain from a bathroom sink is a straightforward process that can be completed in a matter of minutes. By following the instructions outlined in this guide, you can safely and effectively remove the drain for cleaning, repairs, or replacement.

How To Replace A Rusty Sink Drain Howtolou Com

5 Natural Ways To Unclog A Bathroom Sink Hiller How

How To Remove A Bathroom Sink Stopper Take Out Pop Up Drain From

Sink Drain Replacement Bathroom

3 Ways To Clean A Bathroom Sink Drain Wikihow

How To Replace A Pop Up Sink Drain Remove The Old Bathroom Stopper Repair
How To Get A Bathroom Sink Plug Removed When It Won T Un Quora

How To Replace A Sink Stopper Quick And Simple Home Repair

How To Remove A Bathroom Sink Drain Ehow

How To Unclog A Bathroom Sink Hana S Happy Home
See Also


